FASHION & LIFE STYLE

11/30/2014

HOW TO | Layering for the winter


December first.. It means that it's officially winter now (for most of us) and what better way to spend your dark and cold days by wearing knits? 

Where I live it's quite hard to predict the weather (although lately it has been really cold). Sometimes it's enough if you just wear a knit and a thin jacket outside and other days it's like you need to wear two jackets. So today we're going to talk about layering, not just layering but layering for the winter.

But how can you add layers to your knit sweaters without looking like a Michelin man?
We start of with a base outfit, that is basically what you would wear if you don't want to catch pneumonia or catch a cold, in the winter (although it really depends on your high tolerance for cold weather). Then the number of layers is decided. Is it a mild winter day? Then a two layered outfit is enough to withstand the cold and run some errands. More layers means the colder the weather.

Click below for more details for each outfit.

Read more »

11/28/2014

Lala Berlin for Catrice

Lala Berlin for Catrice Cosmetics Limited Edition 
 left side: nail polish C01 Shade of Grey - for sparkling effect | C05 Ruling Red - matt finish | C02 Chilly White - for holographic & sparkling effect | C03 Pink Pearl - for holographic effect | right side: lipstick C01 Ruby Red - matt lip colour | C02 Rude Red - matt lip colour | shimmer powder: C01 Soft Shimmer - for face or décolleté | holographic eye shadow: C01 Chilly White | lip gloss: C01 Ruby Red - with varnish finish

Ihr Lieben, nach einer erneuten kleinen Pause melde ich mich mit einem neuen Trend Bericht wieder zurück ( ˘ ³˘). Diesen November erschien wieder eine Lala Berlin for Catrice Limited Edition - und das Glück hat mir doch tatsächlich ein kleines Catrice Blogger Testpaket zukommen lassen. Ich finde Designer Kollaborationen ja  immer ganz besonders interessant - denn hier erwartet uns in der Regel immer eine perfekte Symbiose aus diversen aktuellen Trends (ノ^^) .

Lala Berlin for Catrice Cosmetics Limited Edition
lip gloss: C01 Ruby Red - with varnish finish

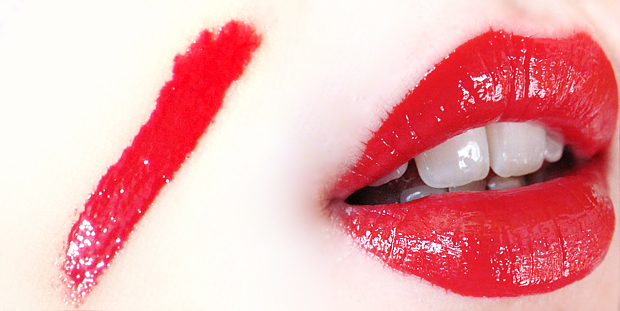
Mein erstes persönliches und vor allem optisches Highlight ist der Lala Berlin for Catrice Lipgloss in der Farbe C01 Ruby Red mit seinem ultraglänzenden Lackfinish! Die Pigmentierung ist einfach der Hammer - doch Obacht liebe Mädels, wenn ihr von Natur aus einen eher blassen Teint habt und dazu noch recht volle Lippen, dann sorgt dieser Lipgloss dafür, dass diese noch üppiger aussehen!!! Also nicht wundern wenn Euch plötzlich jeder nicht mehr in die Augen, sondern auf den Mund schaut (). Leider zieht der Lipgloss aber mit der Zeit ganz langsam in die Lippenfältchen und wird fransig - sieht man auch sofort auf dem Foto oben, welches einige Minuten nach dem Auftrag aufgenommen wurde. Habe den Lipgloss pur und ohne sonstige Grundierung oder Konturierung aufgetragen. Genussvolles Essen, Trinken oder ausschweifende Reden halten, sind demnach eher ungünstig für das optische Erscheinungsbild. Für mich ist dieser Lipgloss daher eher eine Bereicherung für meine Shooting Make-up Sammlung (**).

Lala Berlin for Catrice Cosmetics Limited Edition
lipstick: C01 Ruby Red - (right) | C02 Rude Red - (left) 

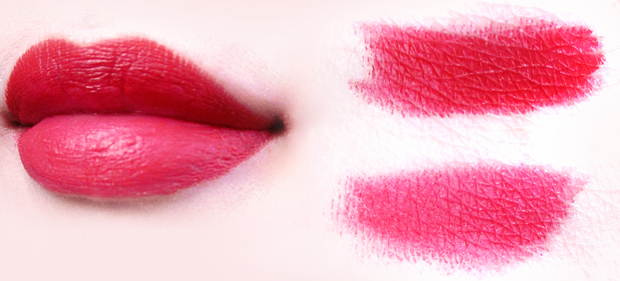
lipstick swatches: C01 Ruby Red - (top) | C02 Rude Red - (bottom)

Kommen wir nun zu meinem zweiten persönlichen und optischen Highlight - die beiden Lippenstifte mit mattem Finish, welche sich auch recht angenehm tragen lassen - (˘⌣˘)!

C01 Ruby Red ist schon allein vom Namen her der passende Lippenstift zum gleichnamigen Lipgloss. Die abgebildeten Swatches geben so ziemlich genau die Farben wieder.

C05 Rude Red hat einen leichten farblichen Stich in Richtung Pink - was ich als Pink-Fan natürlich super klasse finde.

Lala Berlin for Catrice Cosmetics Limited Edition 
 holographic eye shadow: C01 Chilly White | lip gloss: C01 Ruby Red
nail polish C02 Chilly White (forefinger) | C03 Pink Pearl (middle finger)
C05 Ruling Red (ring finger) | C01 Shade of Grey (little finger)

Die Nagellackfarben waren an sich jetzt nicht so sonderlich spektakulär. Jedoch hat es sich auch hier gelohnt mal etwas genauer hinzuschauen (´‿`) :

C02 Chilly White (Zeigefinger)  
hatte einen schönen, subtilen blauen Schimmer - da fand ich die zusätzlichen silbernen Glitterpartikel irgendwie absolut überflüssig.

C03 Pink Pearl (Mittelfinger) 
 ist ein wirklich sehr helles, auf den ersten Blick fast Weiß erscheinendes Rosa mit zartem bläulichem Schimmer. Dieser Lack ist leicht durchsichtig (auch nach zwei Schichten scheint das Nagelweiß hindurch). Hier eignet sich also durchaus der French-Nail-Style.

C05 Ruling Red (Ringfinger)
ist ein matt trocknender dunkelroter Lack.

C01 Shade of Grey (kleiner Finger)
ist ein metallischer Grauton mit feinen rosa Glitzerpartikeln  - diese sind mir allerdings erst bei Kunstlichtbeleuchtung aufgefallen.

Allgemein kommen die Glitzer- und Holografischen Effekte erst unter künstlicher Beleuchtung (oder eben direkter Sonneneinstrahlung) so richtig zum Vorschein. Mich verwundert das übrigens auch nicht besonders, denn meistens werden Beautyaufnahmen ja gerne in geschlossenen Studios (siehe Youtube-Videos zur Limited Edition) unter künstlichem Tageslicht gemacht (´).

 Lala Berlin for Catrice Cosmetics Limited Edition 
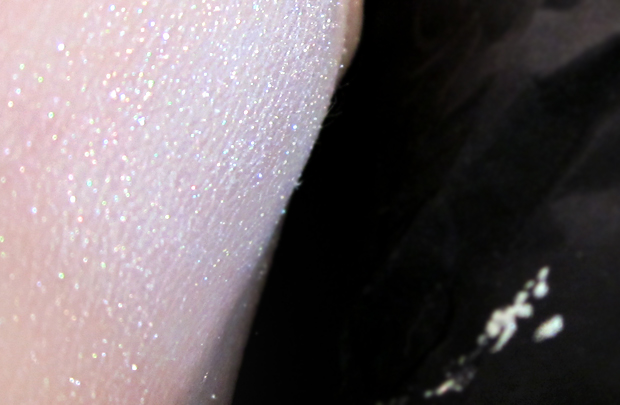
holographic eye shadow: C01 Chilly White | shimmer powder: C01 Soft Shimmer  

Der weiße Lidschatten in C01 Chilly White und der ebenso weiße Schimmerpuder C01 Soft Shimmer  sind bei sehr heller Haut leider fast nicht wahrnehmbar - wenn nicht gerade die Sonne auf die betreffende Hautpartie scheint. Habe für den Swatch im Bild oben extra eine große Menge Schimmer-Puder aufgetragen... aber wie wir ja wissen, ist Weniger bekanntlich auch Mehr (´∪`*).


Habt Ihr die Lala Berlin for Catrice Limited Edition schon in den Läden gesichtet? 
Wie waren Eure Erfahrungen?


11/22/2014

HOW TO | DIY your old coat into a cape


So here's as promised the DIY for the cape.  All you really need is a sewing machine and a little bit of  patience. This DIY will probably cost you 2-4 hours if you're already familiar with sewing. But on top of it all, it's a really fun DIY to do if you have an old coat laying around and want to revamp your wardrobe without really spending money.

 I hope the tutorial can be followed and the pictures are clear enough.. Go on and do the tutorial. And if there are any questions feel free to ask them in the comments below!

What do you think of the DIY?

x J.

Read more »

11/19/2014

OOTD | Because you know I'm all about the capes


blouse H&M, jeans H&M, boots H&M, DIY coat (former H&M)


Wearing capes is perfect a true fall piece. And I've passed on this trend almost every year, because I thought that it wasn't for me. But lately I have been wanting to get one of my own, especially because my favourite style icons frequently wear one (see my Pinterest board). Unfortunately, most ones cost over 100 euros such as this one from Zara. I probably will invest in one later but at the moment am not capable (I'm just a poor poor student ). So while I was looking through capes I stumbled on a DIY by Lana at LanaRed. She used an old coat to make a cape out of it. I thought it was brilliant, such a cheap way and a way to reuse old items. As I was looking through my rack of coats, I remember putting away a coat I didn't want anymore but would be a perfect candidate for this project. Luckily I haven't been able to donate the stack of discarded clothes and could retrieve it. I tweaked the DIY of Lana a bit to my own liking and produced this coat. I'm quite pleased with the result, it only took me a few hours and didn't cost me any money. I will post the process of my DIY in another post soon.


What do you think of the look and my DIYed cape?


Like this post? To keep track, you can follow me on Bloglovin', GFC, or even Instagram.

11/17/2014

1 million Youtube Views littlemissstyleguru

1 million Youtube Views littlemissstyleguru


Hi there all and welcome back to my blog or if your new then hi I'm Vinny aka Littlemissstyleguru.
Some really cool news,well at least I think so lol,I wanted to share with you that I've just reached a huge milestone and hit over 1 million views on my Youtube channel and that is all thanks to you for taking time to watch my videos,so a special big squeeze for you all to show my appreciation.

I started Youtube about 2 and half years back and it that time I will be clocking on up near 1000 videos soon enough  (yikes).
I started youtube as a hobby to help with my mental health issues,although I think I will always live with my crappy anxiety but on the other hand it has helped in such a way that I now have a hobby and my own little place to hang out and chat,oh and of course here,my Facebook, instagram and twitter and all my links are above in the section where to find me, so please come and follow as I love gaining new friends it's brilliant and that is what I class you as is friends.
((Never )) will I be  a youtuber who see you as fans even if I had loads of subscribers, ur just all my friends.

Anyway back to the matter of a million views eek very shocked that you take time out of your days to watch me so again thankyou.
plus I never leave you out as at 5000 subscribers then I will be holding a giveaway,so  please click the link below to subscribe to my channel and then come and join me on my other lives  which is here my beloved blog yay love chatting here and instagram to see my life in pics and twitter and Facebook for a chin wag. 
Thanks again vinny big hugs littlemissstyleguru xxxx

11/14/2014

HOW TO | Designing a logo


As I was sketching ideas for an icon I thought it would be useful to show you guys on how I do it. It is something that I've thought to do myself and came useful for uni as it's something I often have to do for uni as well.

Logo's or icons are seen everywhere and when it comes to having a brand (name it blog, webshop or youtuber) on the internet it is often very useful to have. You can either outsource it or make it yourself, which is way more fun right? But what should you do when you have no idea on how to start? That's where this post come in handy..


Sketch your design
It seems like the most obvious step but a great logo starts from a great design idea. The best way to start designing is to have an idea on what it should portray. Have a brainstorm session on everything your brand is about. For example if your blog is focused on jewellery, write everything down what you think relates to jewellery (e.g. chains, pendants, silver, bling). And start from there by sketching chains, pendants to get your brain working. Another thing to think about is what are your USPs (unique selling points) what deviates you from all the other jewellery shops? Is it 3D printed? Think about combining a few ideas and just let your mind flow. If your stuck or in need for inspiration, it is okay to check pinterest or tumblr. Analyse things you like and incorporate them in your design.


Digitalise your sketch
This is most probably the tricky part where most people get frustrated or clueless. How do you go from your sketch paper to a digitalise version of it? Useful software to have is Adobe Illustrator CS6 ( I have this version but older versions are alright as well). I use Illustrator instead of Photoshop is because you want the image you're creating to be a vector. A vector allows an image to resize without losing the quality (pixels). This is handy because you want to have the freedom to use your logo everywhere without worrying about the quality. If you have a ambitious sketch on paper, which you think is difficult to do it by the eye, a scanner can be useful. You can then open the scan on Illustrator and use 'image trace' to gain outlines of your sketch. With the use of a drawing tablet, which probably saves you a lot of time instead of a regular mouse, you can manipulate the lines to your liking. It may take some practice but eventually you'll get the hang of it.

I've searched some useful tutorials to do this.


Here is the result. It took me longer than anticipated, mainly because I wasn't really satisfied with my original idea and had to change some things a long the way. A phrase that is used often in my school career is to 'kill your darlings' (not literally obviously) but you have to be able to let go of your favourite ideas if it doesn't work out the way you expected and take a step back and redesign it.


Tell me what you think about this sort of post. Is it useful?
Leave your comments below!


x J.


Like this post? To keep track, you can follow me on Bloglovin', GFC, or even Instagram.

Poundland Pamper Nails

Poundland Pamper Nails 

Hi guys so i thought i would purchase some pamper bits from Poundland to do my nails.
If your like me and not too great at nail art then they have some really cute gems which you will see in the photos below,so this is just a heads up,you can get cute nails and not spend a fortune.

So first i preped my hands with the cream above to make them nice and soft and smelling lush as omg if you have not smelt this then you must,it's a hand cream by Creightons and i also own the body cream and bubble bath too,it smells of toffee and has argan oil yum
So how could i not pick up this cute floral girly owl nail set,it has nail file tweezers nail clippers,and for a pound it was too tempting not to purchase,i like to keep my nails pretty short as i think it's more hygenic but for short or long nails then this would be a cute set,especially if you love owls too awww.
Then i bought 2 boxes of nail gems and you get about 12 gems in each i think,one set is colored bows and the others are different silver charms with little diamonte studs,then the nail glue which is good actually for either putting on false nails or glueing the charms to your own nails like i did.
I also grabbed these nail art tools,some people call them dotting tools i think,so that is what i used them for lol,i made spotty nails which looked really cute yet simple,then i used these 2 Jess nail polishes which again they sell in Poundland and they are brill.


so these guys are my cute finished painted decorated nails from Poundland and i must say i loved them,really sweet and so easy to do if like me your not too great at nail art.
Everything was bought from Poundland as i love that place.
Thanks for reading and hope this helped,i noticed they also are doing Christmas gems for nails too so i will try and pick some up next time for xmas.
Thanks for reading love vinny Littlemissstyleguru
Thanks also to Poundland who Follow me on Youtube,so i will leave my Youtube and Poundlands Youtube link below


I was also really happy when my fave shop followed me on Twitter too,i'm sure i live in my Poundland as i do purchase loads from there,love love love it ♥
so here is my twitter link and also the link to Poundlands Twitter page too,thanks all ♥♥


please also keep up to date with the Poundland website to see what deals they have on instore too

11/11/2014

HAUL ft Coco | Autumn staples

 photo haulcoco.gif


(My new cat, coco, decided to hijack this post by refusing to move away from the camera.)

I've been obsessed by clothing with a high neckline/halter ever since I saw it on Amanda Valentine the first episode of Project Runway season 13 (awesome season btw) and it has been my mission to buy a few. The ones I've found at Forever21 are perfect for the fall! I love wearing dark green (hunter green is how they call it online) for fall and the ribbed material makes it more appropriate for the weather, although it's cropped (seemingly inappropriate), it's a perfect basic piece to wear underneath a off shoulder top. Few outfits are already forming in my head.

I can recommend everybody using the Forever21 webshop! Way better than the crowded small spaces where you can't find anything and everything is a chaos at the Forever21 store in Amsterdam. So it's worth the shipping costs. The best part is that it arrives the next day you ordered (two times straight).

You can find more pieces that I've bought below.

ribbed racer tank | €7,45

Read more »

11/08/2014

LOOKS | Knee-boots in three ways


Fall's here and what better way to keep your toes warm with a pair of knee-boots?

A few days ago, I asked a friend (hi Sara) for some blog inspiration and she told me that it would be nice to do a pairing/three looks one item post. So I decided to go for it and pair these knee boots from Bershka. A video is coming this way as it's uploading at this very right moment, but can take a while so I put it in pictures as well. Without further a due, here are my three looks. 

What's your favorite look?


P.S. I haven't decided on how I should name this post.. Any suggestions?
Click read more for the looks!

Read more »

11/04/2014

Beauty Uk Matte bronzer Contour review

Beauty Uk Matte bronzer review

Hi guys just a quicky blog but a total must have bargain.
At the moment i have switched bronzers,although i use this to contour not so much bronze and i love love love it.
It is by Beauty Uk and is a matte bronzer in No2 Dark but it's not too dark for me at all if you blend well it's fan.
There is a No1 medium but i found that shade to be a tad orange but this one in dark )2 is a gorgeous brown.
comes in sturdy packaging and had a cool mosaic style squared pattern to the powder.

Using my Real Techniques contour brush i light dust the hollows of my cheek bone,around my forehead and under my jaw line,so the usual places i contour,you could indeed use any brush and you could indeed use this as a bronzer or even a gorgeous matte eye shadow if you wish so totally multi purpose.
When i love something i just have to tell you about it,also when i hate something i have to tell you but tbh there is so much i don't like ha ha makeup nutta can you tell lol.

Anyway i hope that has helped as i don't like my contour to be shimmery or too orange so this one in dark 02 is perfect even for my pale skin tone with a light hand.
The price is a mere £3.99 and available from Beauty Uk website or the Superdrug Website and links are below.
Thanks for reading Vinny Littlemissstyleguru x♥x


Are you following my blog? as if not then please make sure you do as i always do a little blogaroo dance when i get a new follower on my blog hee hee.
Just look to the right of the screen and follow with bloglovin or google friends connect.
Please don't forget i have a Youtube too,so if your not subscribed there the link is below,please come join the crazy crew,thanks xx♥xx

11/03/2014

PERSONAL | Back from the dead!


Yes this post is about Halloween and yes it's also about me returning from the dead to blogging!
Since I'm a big fan of the Walking Dead, it isn't too difficult of a decision what I wanted to be for Halloween. A 'walker' ofcourse! Or a zombie as they call it as well. But since I was so busy with my uni the past couple weeks (more like months) I didn't really have time to prepare my costume for a Halloween costume party. So I decided to be a Farmer Bob 'walker'. And I must say it's not bad for a 2 hour work of magic! And glueing toiletpaper on my face to make wounds never have been so much fun.

Did you go out for trick or treating?

Anyway, my lonely days in the library till 12AM are gone and my hands are itching again to do some blogging and working on some new projects. Good to be back :)


Like this post? To keep track, you can follow me on Bloglovin'GFC, or even Instagram.