FASHION & LIFE STYLE

Showing posts with label DIY. Show all posts

12/18/2014

HOW TO | Rudolf the rednosed reindeer hairbun


Christmas is about having a jolly good time. And what better way to make people smile and have them feel the christmas spirit? This DIY/hair tutorial will show you how to transform your hair into a christmas reindeer and will make people smile guaranteed!

A friend of mine showed me a picture of this girl with a similar hairstyle and I thought it was such a cute hairstyle for a fun christmasbrunch with some friends and family.

This tutorial will take about 4 minutes to do tops. Click below to see the full tutorial.
Enjoy!

What do you think of this Christmassy hair tutorial? 
Would you dare to wear this?

x J.


Read more »

11/22/2014

HOW TO | DIY your old coat into a cape


So here's as promised the DIY for the cape.  All you really need is a sewing machine and a little bit of  patience. This DIY will probably cost you 2-4 hours if you're already familiar with sewing. But on top of it all, it's a really fun DIY to do if you have an old coat laying around and want to revamp your wardrobe without really spending money.

 I hope the tutorial can be followed and the pictures are clear enough.. Go on and do the tutorial. And if there are any questions feel free to ask them in the comments below!

What do you think of the DIY?

x J.

Read more »

11/14/2014

HOW TO | Designing a logo


As I was sketching ideas for an icon I thought it would be useful to show you guys on how I do it. It is something that I've thought to do myself and came useful for uni as it's something I often have to do for uni as well.

Logo's or icons are seen everywhere and when it comes to having a brand (name it blog, webshop or youtuber) on the internet it is often very useful to have. You can either outsource it or make it yourself, which is way more fun right? But what should you do when you have no idea on how to start? That's where this post come in handy..


Sketch your design
It seems like the most obvious step but a great logo starts from a great design idea. The best way to start designing is to have an idea on what it should portray. Have a brainstorm session on everything your brand is about. For example if your blog is focused on jewellery, write everything down what you think relates to jewellery (e.g. chains, pendants, silver, bling). And start from there by sketching chains, pendants to get your brain working. Another thing to think about is what are your USPs (unique selling points) what deviates you from all the other jewellery shops? Is it 3D printed? Think about combining a few ideas and just let your mind flow. If your stuck or in need for inspiration, it is okay to check pinterest or tumblr. Analyse things you like and incorporate them in your design.


Digitalise your sketch
This is most probably the tricky part where most people get frustrated or clueless. How do you go from your sketch paper to a digitalise version of it? Useful software to have is Adobe Illustrator CS6 ( I have this version but older versions are alright as well). I use Illustrator instead of Photoshop is because you want the image you're creating to be a vector. A vector allows an image to resize without losing the quality (pixels). This is handy because you want to have the freedom to use your logo everywhere without worrying about the quality. If you have a ambitious sketch on paper, which you think is difficult to do it by the eye, a scanner can be useful. You can then open the scan on Illustrator and use 'image trace' to gain outlines of your sketch. With the use of a drawing tablet, which probably saves you a lot of time instead of a regular mouse, you can manipulate the lines to your liking. It may take some practice but eventually you'll get the hang of it.

I've searched some useful tutorials to do this.


Here is the result. It took me longer than anticipated, mainly because I wasn't really satisfied with my original idea and had to change some things a long the way. A phrase that is used often in my school career is to 'kill your darlings' (not literally obviously) but you have to be able to let go of your favourite ideas if it doesn't work out the way you expected and take a step back and redesign it.


Tell me what you think about this sort of post. Is it useful?
Leave your comments below!


x J.


Like this post? To keep track, you can follow me on Bloglovin', GFC, or even Instagram.

3/28/2014

DIY | From leggings to crop top


When I saw this on Youtube I had to try this out! How to get this cute cropped top from leggings or stockings. I have to say that the outcome is definitely better than expected. I had these shiny swimsuit material leggings (don't ask why I got it) which I don't wear at the moment or any time soon. So decided to try this DIY out. The only thing you need are a pair of scissors, preferably fabric scissors.


Here's how to:
1. cut the end of the stocking.
This will be your sleeves. The more you cut from the ending, the shorter your sleeves will be.

2. cut a little triangle at the part where the two legs meet.
This will be the opening for your head. First cut a small triangle, you can always cut more if the opening is too small. 

3. trim the cut neatly.


Let me know in the comments below what you think of this easy DIY!

step 1

step 2

J.


Like this post? To keep track, you can follow me on Bloglovin', GFC, or even Instagram.

3/23/2014

DIY | Personalized mug (gift idea)


Finally a DIYpost. Sorta? For a course at uni I wanted to draw on porcelain plates, so I needed to test it out first for the prototype. So why not make a video out of it?! It's really easy to do and a nice idea for a gift!

Let me know what you think!


J.


Like this post? To keep track, you can follow me on Bloglovin', GFC, or even Instagram.

1/23/2014

OOTD | Tie it up!


H&M plaid blouse as skirt DIY, Mango white shirt, H&M jacket, H&M leather ankle boots, Fjalraven backpack,
Lana's sieraden necklace
Just my luck.. I always get tons of ideas to post when I'm supposed to study and write reports. Yesterday night I was browsing through my closet to find something to wear for my first show at Amsterdam Fashion Week! Which will be this sunday, I'm so excited but I really didn't know what to wear. So as I'm digging up some old pieces and matched it up, I found some new exciting outfits. Still not certain what to wear for AFW but at least I got some outfits ready for the next few days..

I've seen a lot of plaid skirts and I really want to buy the perfect one as well but I don't have the time to search or the money (student life) for one. So I used this H&M blouse I had laying around and tie it up like a skirt. I like the outcome and it's super easy! You can do this with any blouse, if you don't mind wrinkling it a bit and there's no stitching needed. Ideal! Now I have my plaid skirt without spending any more money.

You guys interested in a DIY?


And how about this cool necklace I got from sweet Lana at Lana's sieraden. The knotted detailing is really cute and it looks great with any top under. I have some awesome news for you guys, you can win this necklace! The giveaway would only for you Dutchies unfortunately but no worries, I will have an international one in the future!

Stay tuned for the giveaway! I will post all the details tonight!


J.


Like this post? To keep track, you can follow me on Bloglovin', GFC, or even Instagram.

11/19/2013

DIY project | Plumbing pipes table/bench


I had to make this bench/table for my project which didn't quite work out, so I made it into a bench for in my room where I can sit and put on my shoes or just for decoration. I had a lot of fun making this and it's so easy! All you need is a pipesaw or just a regular metal saw, the compression fittings, some wood and the pipes. I haven't attached the wood onto the pipes yet because I'm planning to make the table shorter. But you can get the general idea here.

What do you think? A good idea for a future DIY post?

J. 


10/27/2013

Charcoal Art and Fashion News about Primark & Tally Weijl

charcoal character drawing -  say Hello to "Lila"

Sagt Hallo zu "Lila". Eine zufällige Charakter Zeichnung aus schwarzer Kohle - danach am Computer digital coloiert. Vom Stil her wie ihr sehen könnt, ein aktuelleres Werk (#⌒∇⌒#).

Primark Fashion News

another Primark store will open here in Germany

Vorweihnachtliche Überraschung in Düsseldorf
PRIMARK kommt in die Modestadt

Düsseldorf - Fashion - Trend & Style: Kaum ein Ort wird so stark mit dem Thema Mode in Verbindung gebracht wie die Stadt am Rhein. Und doch wartet ganz Düsseldorf bereits auf ein neues Highlight:
Am 10. Dezember 2013 um 11.00 Uhr 
eröffnet der PRIMARK Store auf der Schadowstraße 56

In unmittelbarer Näher des neuen Kö-Bogens wird das Textilhaus, dessen Wurzeln in Irland liegen, den anspruchsvollen Düsseldorferinnen und Düsseldorfern auf insgesamt vier Etagen und 5.667 Quadratmetern alles bieten, was das fashionverliebte Herz begehrt. Das Spektrum reicht von Damen-, Herren- und Kinderbekleidung über Accessoires, Schuhe, Schmuck bis hin zu Schönem für Zuhause.

Soweit ein kleiner Auszug aus der Pressemitteilung, die am 23. Oktober, also am vergangenen Mittwoch herausgegeben wurde.Einige Bloggerkolleginnen hier kommen ja aus dem Raum Köln-Düsseldorf und ich bin schwer gespannt wie die neue Filiale bei Euch ankommen wird... ♥~(‘▽^人)

Tally Weijl Fashion News

this season Tally Weijl is offering a look-a-like of the famous olive Zara parka with the leopard lining inside

Letzte Saison wurde ja unter anderem der olivgrüne Zara Parka mit dem abnehmbaren Leopardeninnenfutter (ich liebe mein Exemplar, auch wenn es getragen ein gefühltes Extrakilo wiegt) sehr gehypt. Ich sehe gerade jetzt wieder vermehrte Suchanfragen mit den Begriffen "Zara Trafaluc Leo Parka" auf meinem Blog landen. Hatte ja bei meinen Pretty Little Secrets Post (hier) schon mal das schöne, kuschelige Innenfutter gezeigt, das Ihr oben im Bild auch noch mal sehen könnt ( ˘ ³˘) ♥.

Die gute Nachricht für alle, die diesen Style nicht mehr ergattern konnten ♥(ˆ⌣ˆԅ):
Es gibt jetzt ein nahezu identisches Look-a-like (und weniger schwer im Gesamtgewicht, d.h. aber auch nicht ganz so dick gefüttert) bei Tally Weijl zu haben. Das Innenfutter ist aber meines Wissens nach aber nicht abnehmbar. Also schaut doch einfach mal bei Tally Weijl vorbei, wenn Ihr nach einem solchen Modell sucht (*⌒∇⌒*)ノ.

10/21/2013

Cute Tony Moly Mini Bunny and Bird Etching Art

 
When you do etching art you need a hand cream afterwards to care your skin on your hands because the colors and solvent are not that skin friendly - so always get your hands on a nice hydrating hand cream afterwards: 
for me this is my cute Tony Moly Mini Bunny Hand Cream (^__^)

Heute gibt es mal wieder etwas aus der Abteilung Beauty und Kunst ヾ(*⌒ヮ⌒*)ゞ. Ich habe unter anderem auch das Vergnügen gehabt mich intensiv in der Kunst des Kaltnadelradierens auszuprobieren. Da man bei dieser Art der Kunst viel mit den Händen und mit Farben und Lösungsmitteln arbeitet (Handschuhe benutzt man da in der Regel nicht, d.h. alles kommt in direkten Kontakt mit der Haut) ist es wichtig die Hände danach ausgiebig mit Wasser und Seife zu waschen, denn die Fabe selbst bekommt man nur mit Lösungsmittel wieder ab. Damit die Haut danach nicht so trocken und strapaziert ist, ist es wichtig diese nach der ganzen Prozedur ausgiebig einzucremen (┌・。・)┌. Meine Liebslingshandcreme ist die Mini Bunny Sweet Pink Hand Cream von Tony Moly. Die Marke Tony Moly ist übrigens eine Koreanische Marke (wofür auch dieses besonders süße Verpackungsdesign spricht). Das Sweet Pink spricht aber nur für die Hauptfarbe der Verpackung - das eigentliche Produkt ist ganz gewöhnlich weiß.

 
Detailed view:  two ink etched birds on a twig with some pastel pink and white flower highlights

Auf der Suche nach neuen Inspirationen fand ich auch eine meiner alten Lieblings-Kaltnadelradierungen wieder: Zwei süße Vögelchen auf einem blumigen Zweig. Eigentlich auch ein schönes Frühlingsbild. 

10/06/2013

My tic tac Cherry Sailor Girl Design

You might still remember that i joined the tic tic Germany packaging design contest (link). I made it to the Top 40 best designs (jury voting), but I did not made it to the Top 10 (Facebook voting), however, i won one of the surprise packages. Today i want to say *Thank you tic tac Germany for my surprise package* and show you the content:
Here you see two tic tac Big Packs (fresh orange & mint), some tic tac strawberry Mini Mix Packs, a VIP umbrella (see photo below) - and especially for my dearest readers, followers, fans and friends: my tic tac Cherry Sailor Girl packaging design as a real life paper made version (ignore the shiny tape stripe on the left)...maybe the European market and fans are still not ready for cute character designs - therefore i decided to use a japanese magazine setting! - tic tac Cherry Sailor Girl packaging design © Vernissage and Cream 2013

Ihr erinnert Euch vielleicht noch, dass ich mit meinem Cherry Sailor Girl Design bei dem tic tac Deutschland "Design your Pack" Wettbewerb mitgemacht habe (link). Ich hatte es unter die Top 40 besten Designs geschafft, die von einer Fachjury ausgewählt wurden. In der zweiten Runde, dem Top 10 Facebook Voting, war ich allerdings nicht mehr mit in den Top10 dabei. Aber ganz leer ausgegangen bin ich dann doch nicht, denn ich habe eines der Überraschungspakete gewonnen <(=*3*)> :
Enthalten waren jeweils zwei tic tac Big Packs in den Geschmackssorten fresh orange und mint, sowie zwölf kleine tic tac strawberry Mini Mix Packs und ein VIP Regenschirm (Foto siehe unten) *Vielen Dank tic tac Deutschland*.
Außerdem seht Ihr hier noch mal exklusiv ♥
mein tic tac Cherry Sailor Girl in Lebensgröße als Papier Version ..(•^.^•)..
Wir haben ja ein Verpackungsmuster gestaltet, also ließ sich das dementsprechend auch schön einfach zusammenbasteln (bitte den Tesaklebestreifen auf der linken Seite ignorieren)...anscheinend war der Europäische Markt und die Fans (noch) nicht bereit für niedliche Charakter Designs fernab der bereits etablierten tic tac Charaktere - deshalb habe ich als Hintergrund eine japanische Magazinseite gewählt (๑¯◡¯à¹‘)! - tic tac Cherry Sailor Girl Design © Vernissage and Cream 2013 ♥

 The huge tic tac VIP umbrella - a very big automatic pocket umbrella with a tic tac character printed on it

Zu guter letzt moch das Highlight des Überraschungspaketes: Der VIP Regenschirm (ღ˘⌣˘áƒ¦).
Der Schirm war wirklich größer als ich dachte - die Bezeichnung "Zelt" passt da sehr gut - und ist ziemlich stabil gebaut (windproof). Praktischerweise lässt er sich auch ganz einfach per Knopfdruck öffnen (Achtung, nicht erschrecken ^^). Momentan ist ja wieder einmal Regenwetter angesagt, d.h. wenn mein jetziger Handtaschenschirm die Biege machen sollte, ist bestens für Ersatz gesorgt (´▽`)!


3/21/2013

Ikea hack done - Highchair

our chair

Remember I was inspired by the ikea hack i wrote about here, done by dwellings by devore, well I did it! I am so happy with the result. Chic gold legs and a vinyl monogram purchased in derikson´s etsy shop. The easiest DIY ever done. I am on the run, got to pick up Matt from daycare, will read your comments and reply soon!
the inspiration

3/18/2013

Tea Station


Hello! How was your weekend, mine was lovely, it´s great to be back and to be healthy, I am full of energy and I feel I have missed out on so many blogposts! I did nice things this weekend with Mr Beau and Baby Matteo, and had some time to rearrange some things in the house. I am still very fond of the lucite side table I bought in Zara home a few years ago, I had beautiful antique glass decanters placed on top of it, but with Matteo´s fingers touching them, I was afraid he might break them and so I stored them away. Now I use it as a tea station, I drink a lot of Chinese green tea, and these things all together could break, but are not that fragile as antique decanters.


Good quality wrapping paper with snake skin print I have placed underneath the lucite top on my wooden chest, I am very happy with the result.

All pictures taken with my new iphone 5, thanks dad for giving it to me as a present, love you!

2/12/2013

Ikea hack- Highchair

When reading the post of one of my most favorite blogs Dwellings by Devore, I saw that se had hacked the Ikea high chair. It´s simple DIY but so pretty. She spray painted the legs in gold and added a vinyl monogram to the seat. Now that´s a winner! I also have the Ikea high chair and I am planning to do this fantastic DIY soon.

Highchair with gold legs = so Chic!

1/30/2013

O´verlays love


I absolutely love O´verlays, I wrote about my O´verlays before. I keep checking them out and every time they have more splendid DIY make overs and IKEA hacks. Their customers have excellent taste and I appreciate the fact that thanks to O´verlays we can update a not so good looking piece or a plain ikea piece of furniture with little money and give it a designer look.


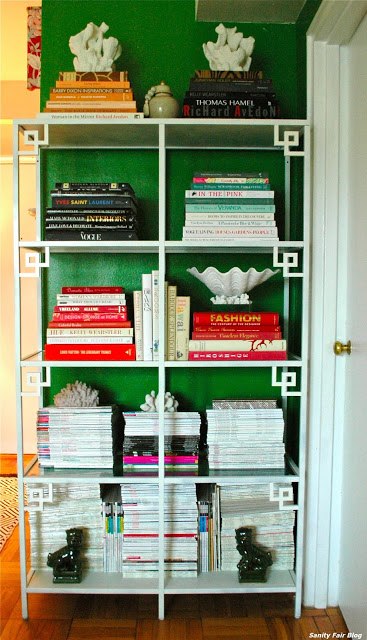
How about the above Ikea hack, O´verlays sells these thick Greek key corners to make the simple shelving unit so pretty. It´s the shelving unit called VITTSJO, costs 70 dollars.


vistit O´verlays